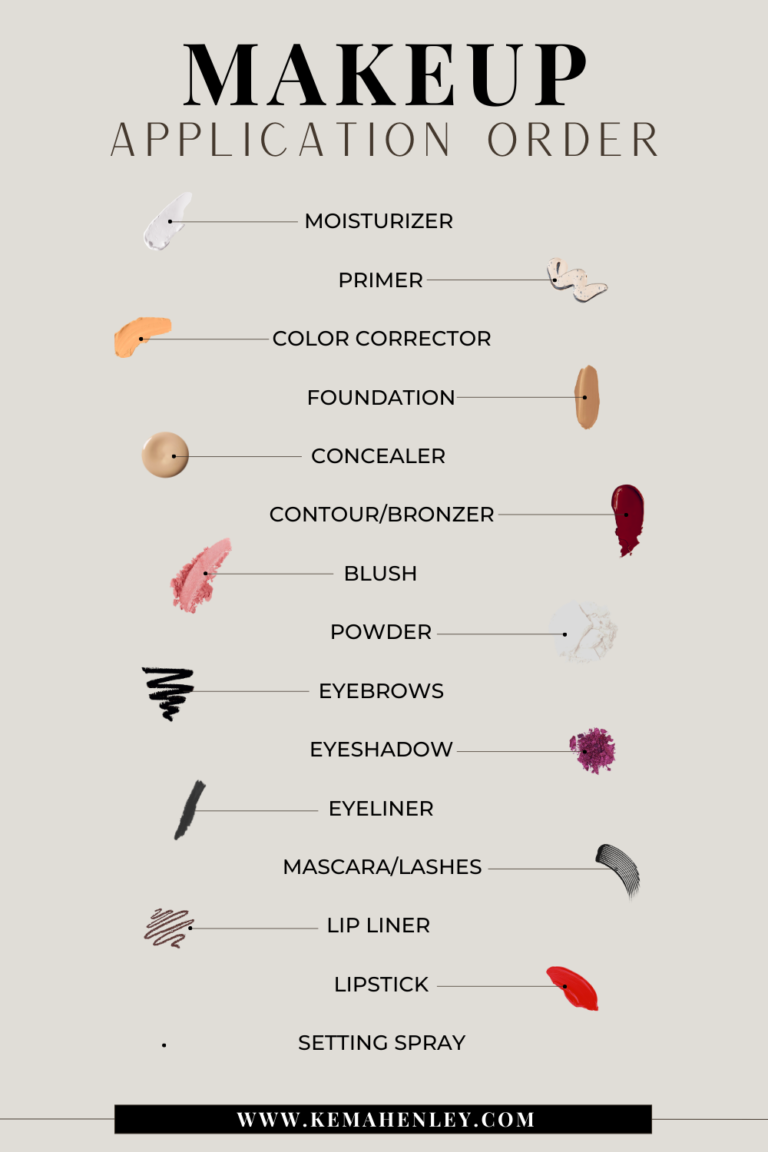
Eyebrow Mapping 101: A Step-by-Step Guide to Achieving Flawless Brows
This post may contain affiliate links, which means I’ll receive a commission if you purchase through my link, at no extra cost to you. Please read the full disclosure here.
Eyebrow mapping is one of the most reliable techniques you can use when it comes to shaping your eyebrows yourself. In fact, this is the exact technique your local technician would use if you were to make a microblading appointment. If you’re tired of spending money to shape your eyebrows or recovering from a botched eyebrow job, here’s a tutorial you can follow right in the comfort of your home.
I’ve had my fair share of eyebrow appointments that have gone completely wrong until I finally decided – no one else would touch these brows! Some may call it trust issues but we’re going to call it a learning opportunity.
Eyebrow mapping allows you to create perfectly shaped brows starting from the front all the way through the tail. By the end of this post, you’ll be able to shape your eyebrows with confidence.
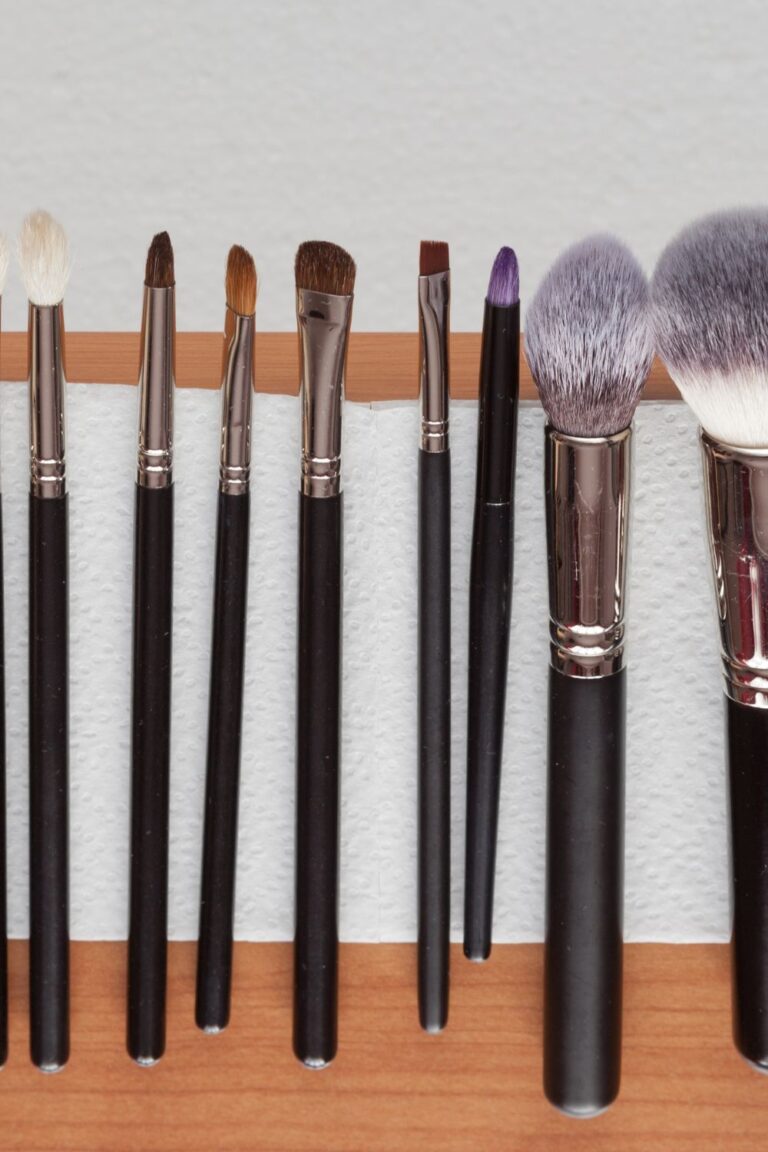
Here are some tools you’ll need to shape your brows:
Before you start, you will need to cut and coat about 10 inches of thread.
Most tutorials would say to coat your thread with an eyebrow pencil but in my experience, the thread ends up cutting straight through the point of the pencil.
Instead, I suggest using any type of liquid makeup that you can easily drag your thread through. Make sure it’s darker than your skin tone so you can clearly see your lines.
Here are two more alternatives:
- Purchase a brow mapping pencil
- Order precoated thread from Amazon. When I found this product I thought it was pretty awesome; it definitely cuts down the prep time and any mess that might end up on your hands.
Steps to Shape Your Brows Using Eyebrow Mapping
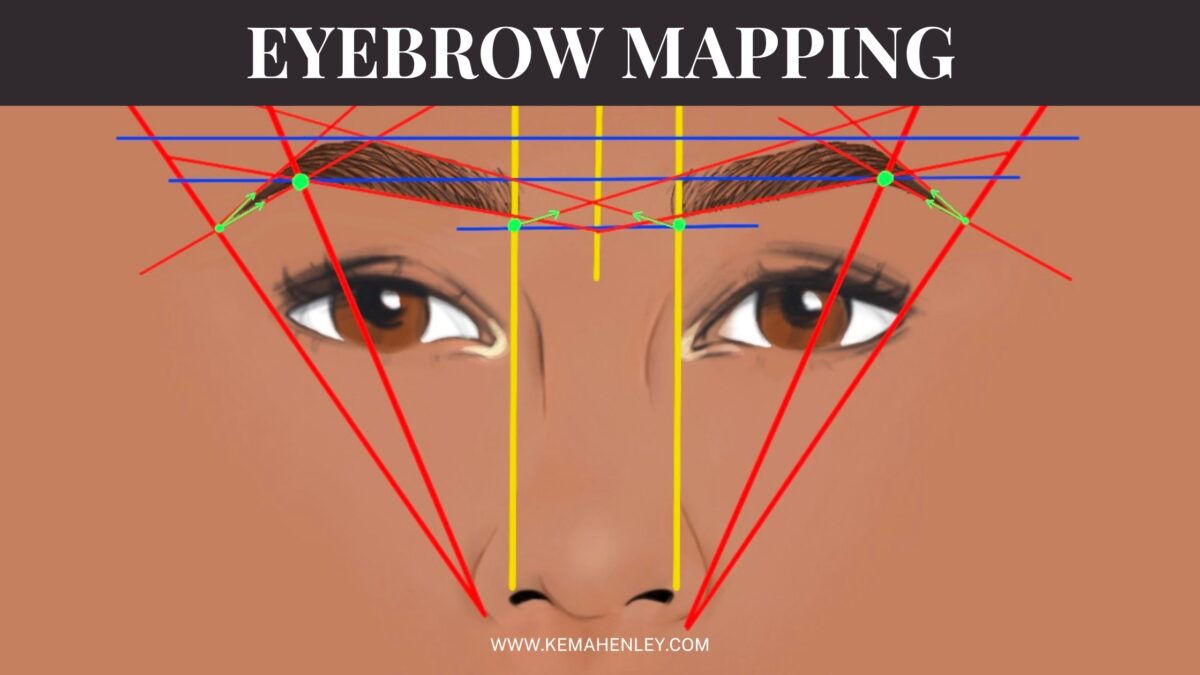
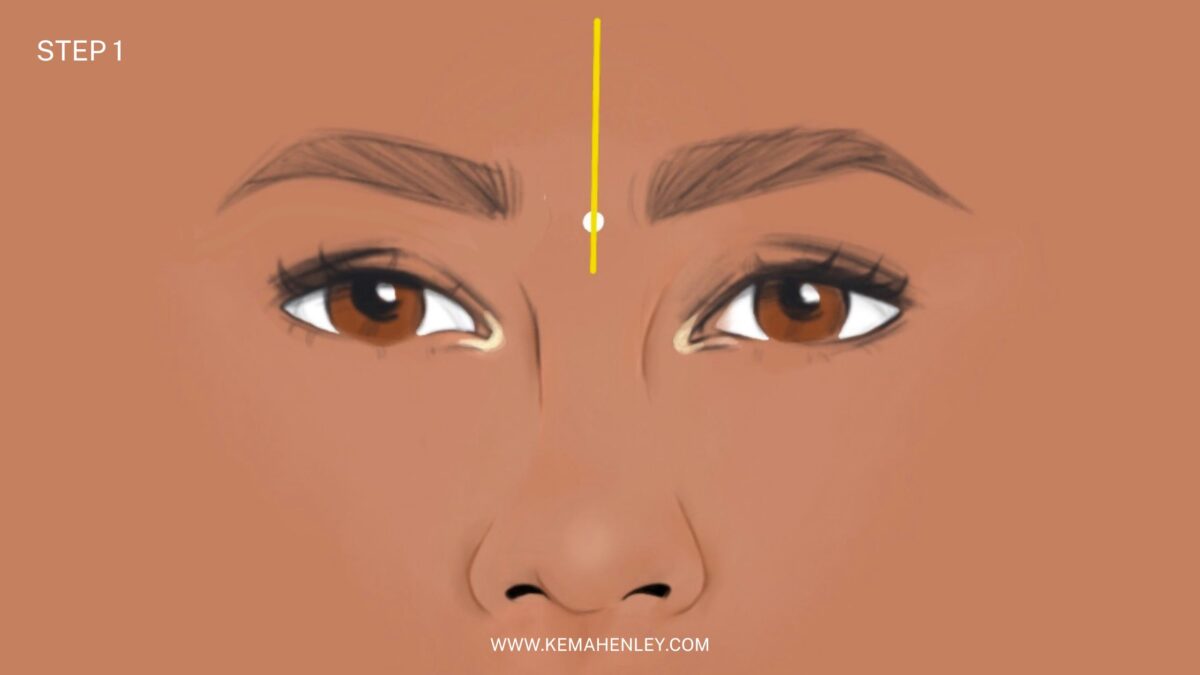
1. Mark the center point of the face
The center point will be your starting guide to creating a map of the eyebrows. You can use an eyeliner pencil to help make the center point as distinctive as possible. Once you find the center point, draw a line up towards the forehead. You can use an eyebrow mapping ruler to make sure your lines are straight.
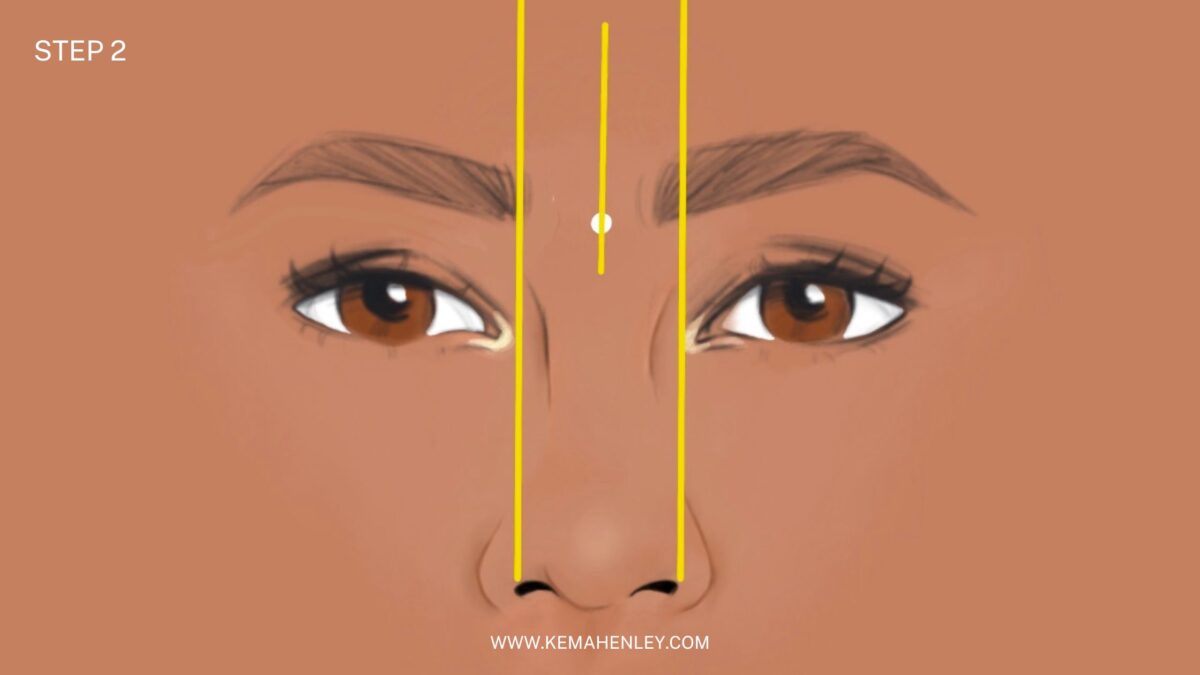
2. Mark the head of the eyebrows
To determine where your eyebrows should begin, you will need to create two vertical guidelines.
Start from one nostril and line your string vertically, past the inner corner of your eye.
Repeat on the opposite side.
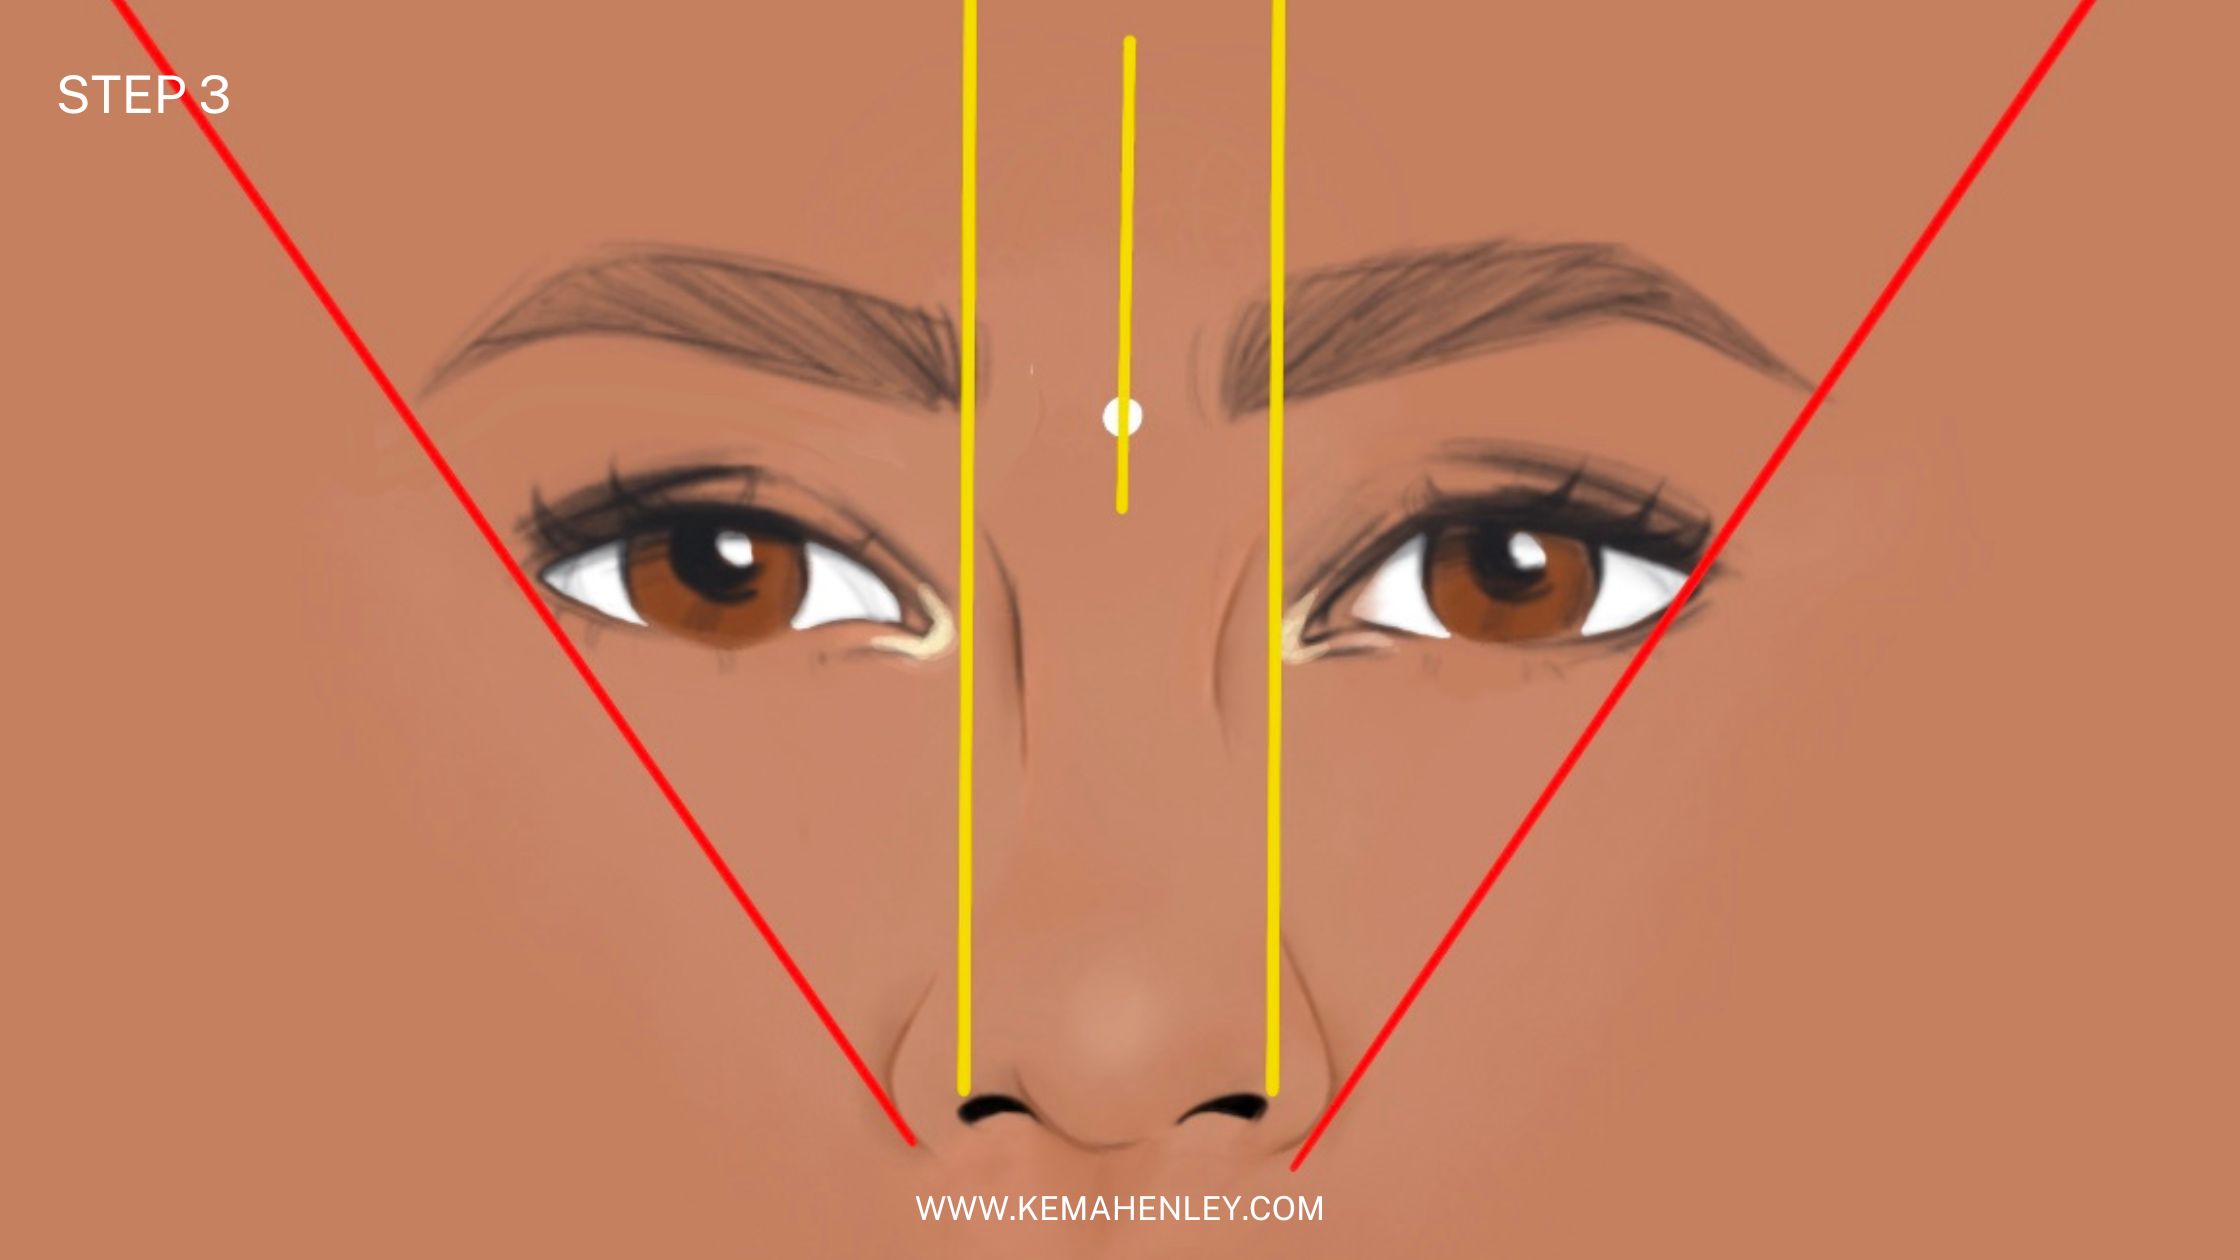
3. Mark the ends of the eyebrows
To find the end of your eyebrows, you need to create two diagonal lines. Start from the end of the nose and line the string toward the outer corner of the eye.
This step will help determine the length of the eyebrow tail. If the brows are too sparse or have shaven tips, make sure the thread is aligned as close as possible to the outer corner to get the best possible placement.
Repeat on the opposite side.
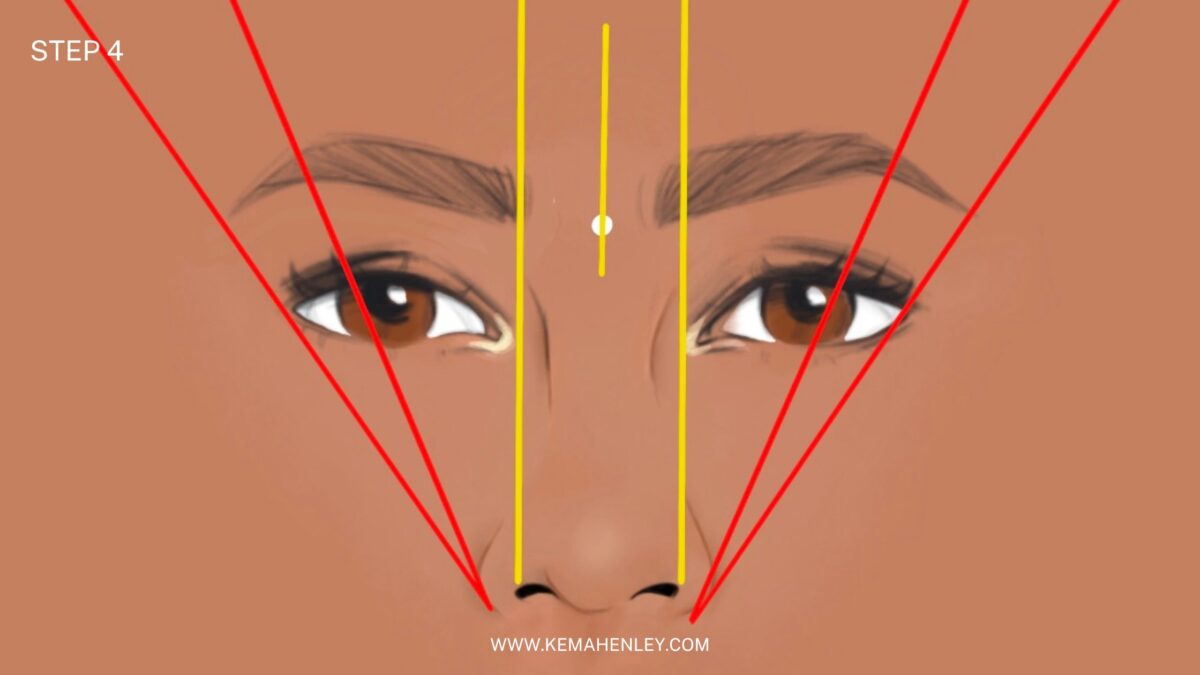
4. Find the arch
Next, you will draw a second set of diagonal lines to find the highest point of the eyebrow arch.
Looking straight ahead, align the thread from the end of the nose up to the outside of the iris.
All face shapes are different, be the judge and test out which angle fits the face best and aligns with the natural arch.
Before moving on to the next step, take this time to make any slight adjustments. Professional technicians use eyebrow mapping rulers for accurate measurements. Since most of us probably don’t have one in our home you can use a small ruler or measuring tape if you desire. But eyeballing it will work just fine.
The eyebrow mapping ruler is used to determine if the distance of the arches from the center point is even on both sides.
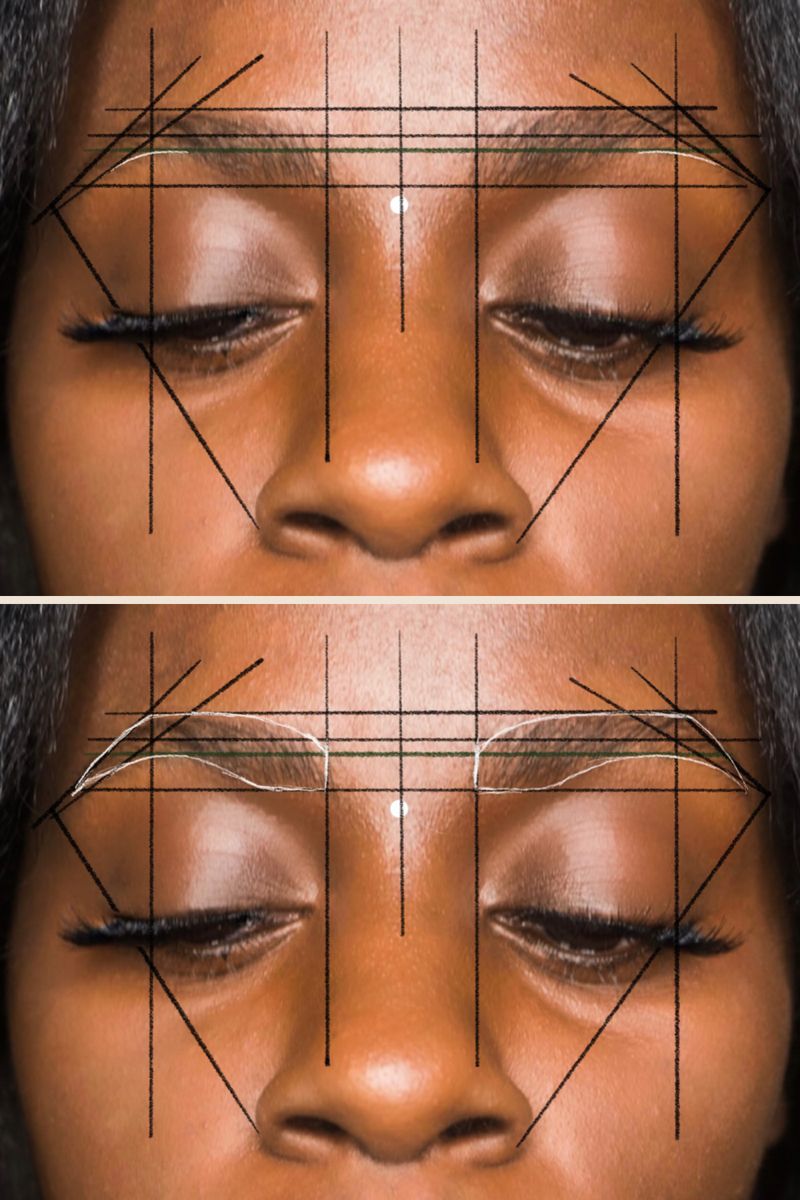
5. Determine the thickness of the brow
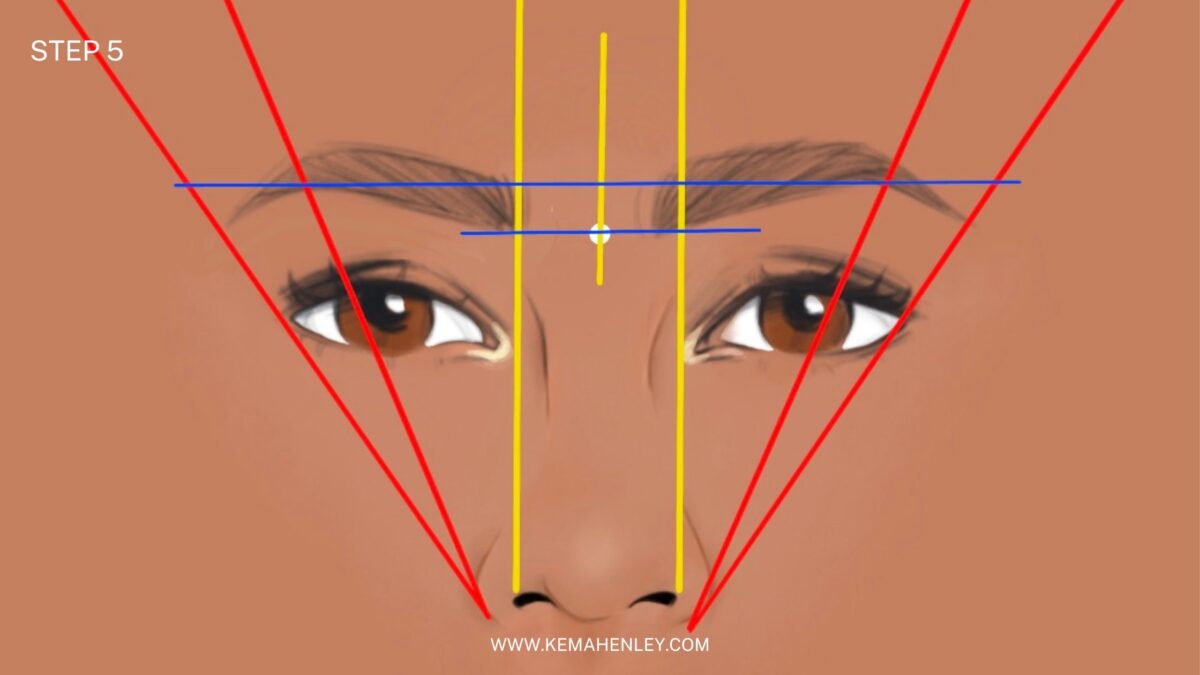
From the lowest point of the bulb make the first horizontal line. Extend the thread from the beginning of the left brow to the beginning of the right brow.
From the highest point of the bulb make the second horizontal line. Extend the thread from the beginning of the left brow to the beginning of the right brow.
6. Create a guide for the bottom body of the brow
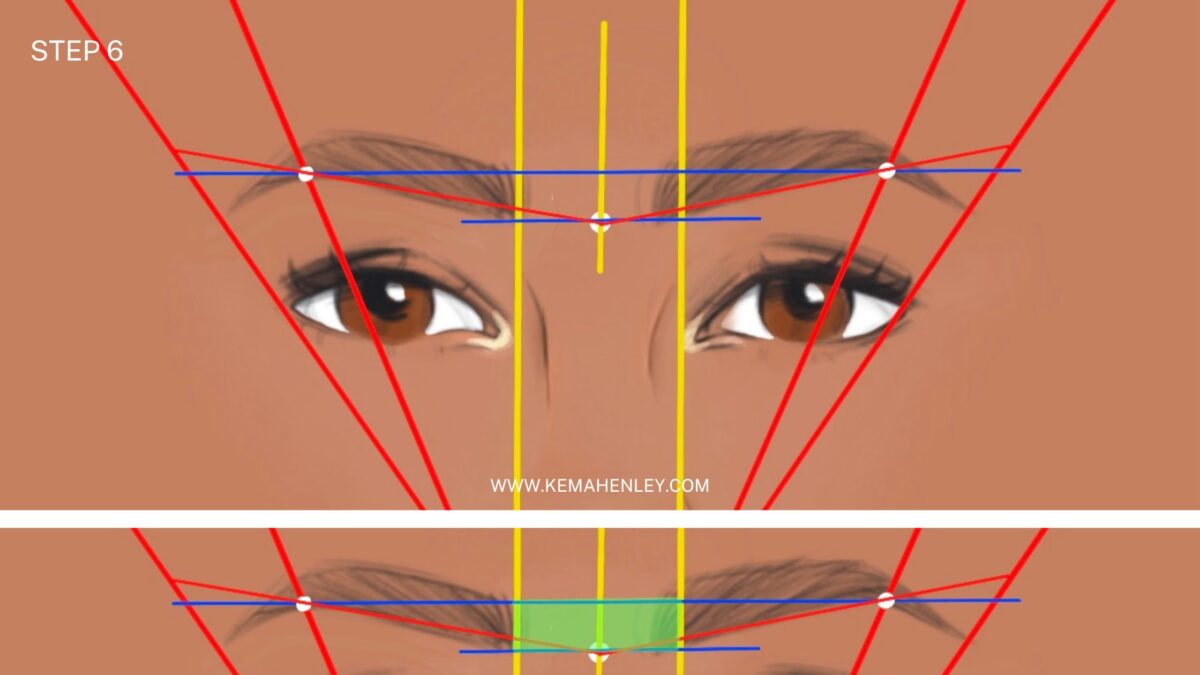
Starting at the center point, extend the thread horizontally towards the inner more diagonal line.
Repeat on the opposite side.
To make the intersecting points more visible you can use the eyeliner to draw points where necessary.
Before moving on to the next step take note of the box in the center of the brows. This will help guide you through the next couple of steps.
7. Create a guide for the top body of the brow
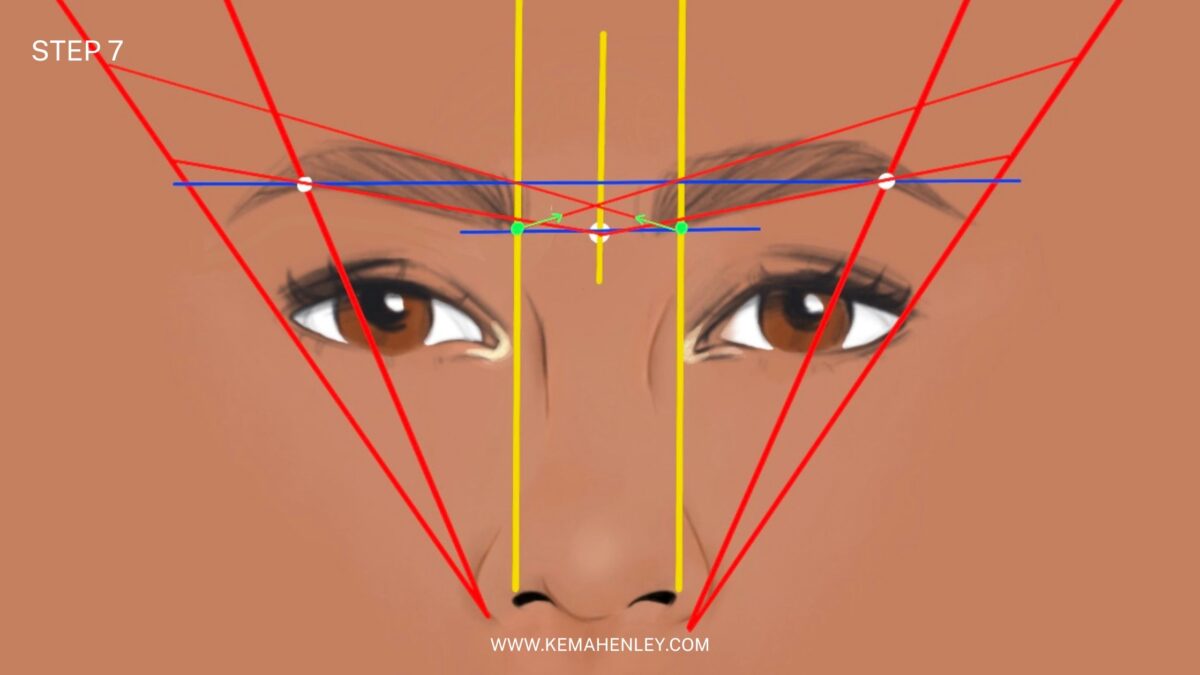
Start from one end of the “box” and extend the thread to the opposite upper corner of the “box”.
Repeat on the opposite side.
You should now notice an “X” at the center of the brows.
8. Create the tail
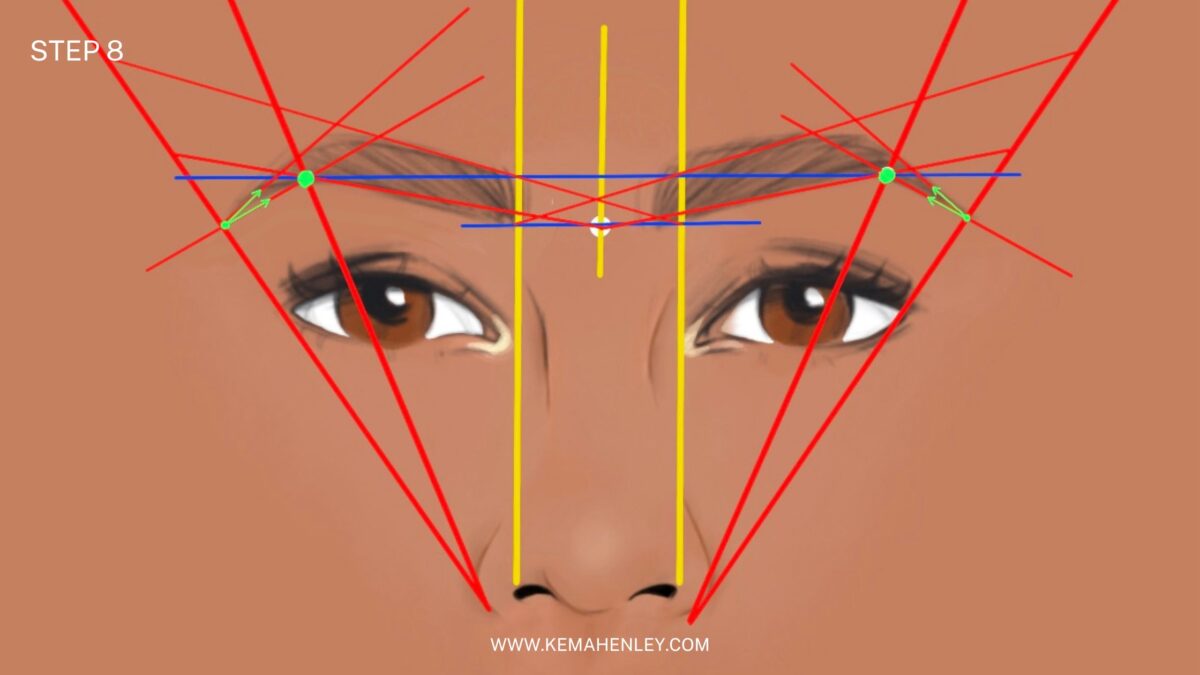
Starting from the outer more diagonal line, you are going to create two more diagonal lines leading up toward the forehead.
The first line will intersect the innermost diagonal line.
For the second line use your judgment to decide how thick the tail should be, use the natural brow as your guideline.
Repeat on the opposite side.
9. Determine the height of the arches
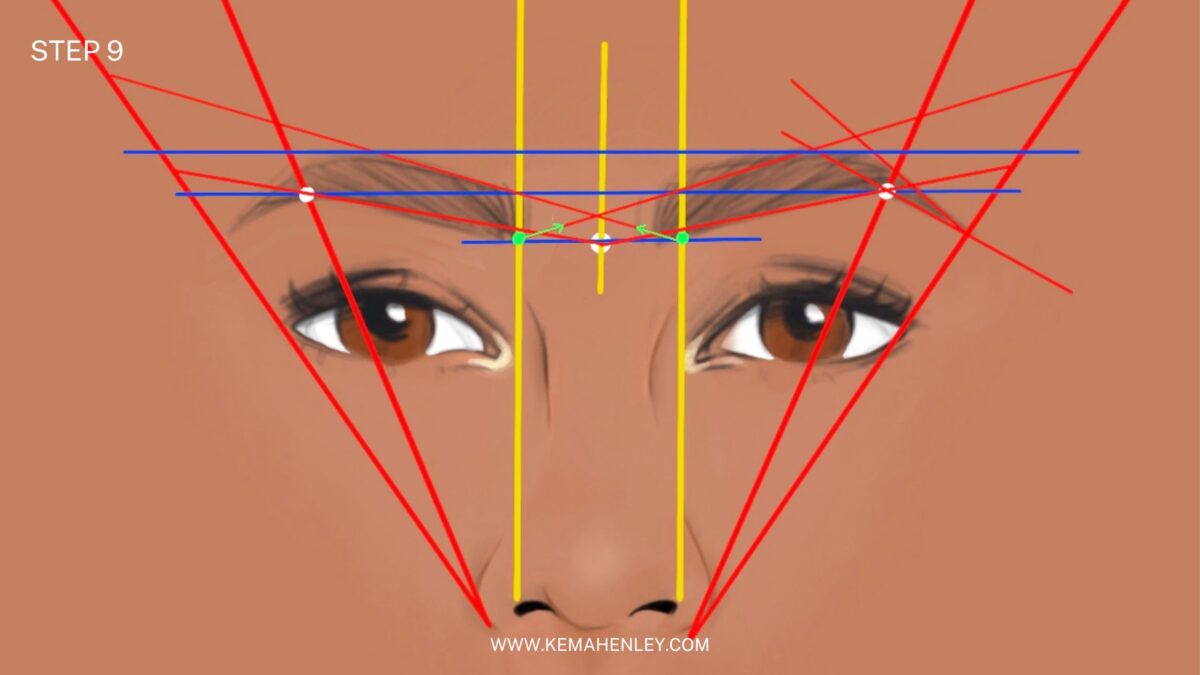
Simply extend the thread horizontally from one arch to the next.
10. Outline the desired shape
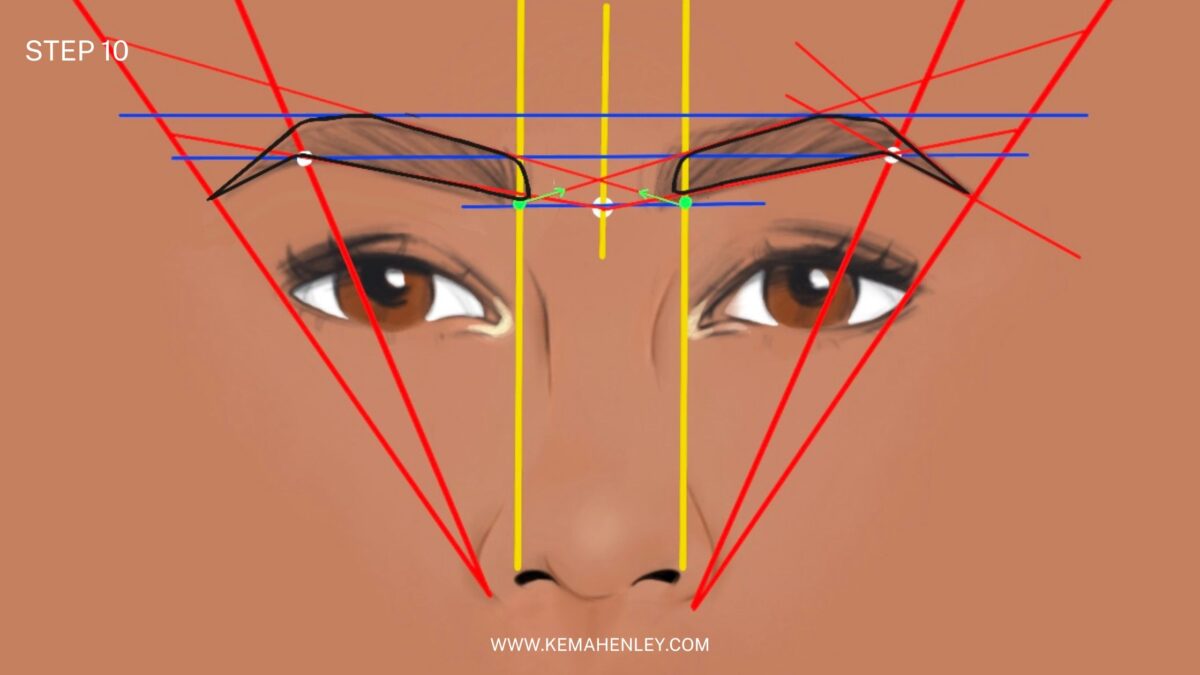
Now that you have all the correct lines in place, you should be able to see the desired brow shape. Take a brow pencil and begin to define the shape of your brow as a whole.
When you’re done you can remove any unnecessary lines.
What to Do Once You’re Done Mapping Your Eyebrows

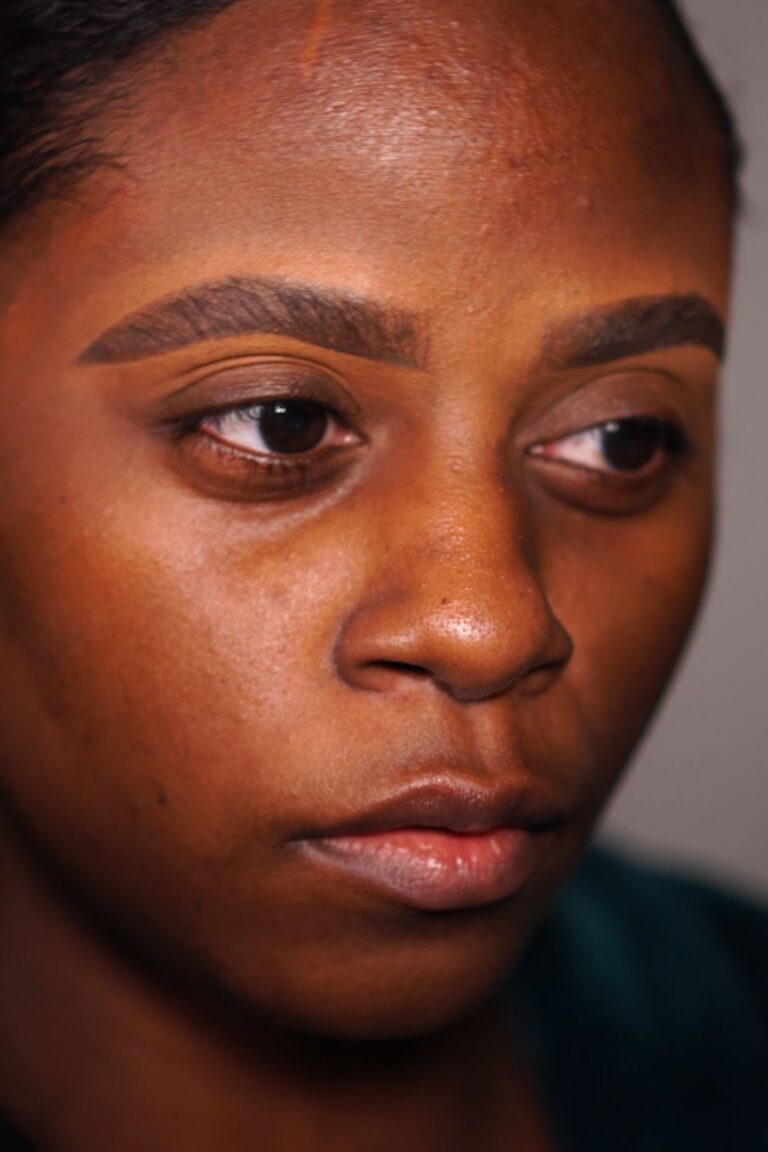
Now that you have your desired eyebrow shape you can begin to groom your brows and remove unwanted hairs. If you have spots that need to be filled you can easily fill them in with your brow pencil or a brow tint.
I suggest using this technique to shape your brow at home when you have spare time. Placing the lines in the right spots does take some practice but the end results are worth it!
Learning how to groom your own brows can save you time and money.
But if you still can’t seem to get them right on your own, make an appointment with a professional and be vocal about your desired expectations.